WebCreator 8 - Uploading your site
To be seen and visited, your site needs two things: a hosting plan and a domain name.
Hosting
Your site must be accessible to all and therefore must be uploaded to a server that is constantly connected to the internet and that can handle the volume of visitors. This is what is called hosting.
Domain Name
The other requirement is that your site have an access address of its own and that it is unique and always the same. This is what is called a domain name, such as LMSOFT.COM.
It is essential that the domain be your property and not that of the host, to be sure that only you can use it. Some providers offer so-called free domains. Beware! If you want to move elsewhere, you may find that you can’t and that you are effectively trapped.
This is not our philosophy. Sites created with WebCreator can be hosted anywhere and we leave you complete freedom of choice in the matter.
LMSOFT also offers quality accommodation at competitive prices. You domain and data are always yours, and you are free to come and go as you please.
The advantage of being hosted by us is to be independent of service providers with whom you are somewhat buried among millions of customers. If there is a technical problem, our technicians will be able to help you quickly and efficiently. There is no risk of being caught between two suppliers who may find it convenient to blame each other. If you are hosted with us, it won’t happen.
Uploading the site
When you register to a host, all the connection information including the URL and the paths you use are transmitted while you have to define the user IDs and passwords.
This is required only once per connection. WebCreator will keep the settings for later use.
WebCreator 8 has a very simple transfer tool for sending files from your site to its destination on the internet.
In WebCreator, the upload of your site is done via the Tools/Web Output/Upload.
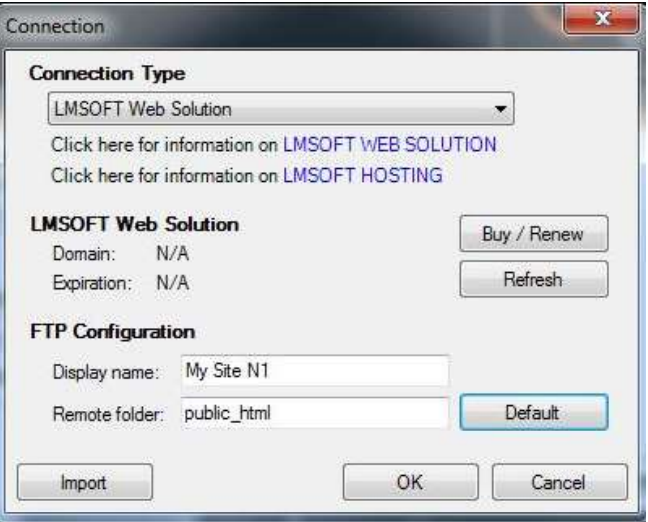
At first access, the following dialog box appears.

In Connection Type, the default value is LMSOFT Web Solution / LMSOFT Hosting.
The option LMSOFT Hosting is for previous versions and demos versions.
Fill in the following fields:
- Display Name: This field is used to help you use the proper connection, useful if you have several websites .This is a reminder for you.
- Remote folder: For a LMSOFT hosting, click the Default button, which will automatically add the public_html value.
If you are hosted elsewhere, in Configuration Type, choose Manual Setup. Type in the remote file name. At LMSOFT, it’s index.html, but this can vary from one host to another. Check the information provided by your host.
Another frequent source of confusion : transfer the CONTENT of the WEB folder and not the WEB folder itself or the project folder. In WebCreator all these settings are set by default to the correct values. But since the requirements can vary with other hosting providers, you have to be careful and verify all the settings.
The local folder in WebCreator integrated tool must be WEB. This is where the HTML code resides, and this code is what must be transferred to the remote server or host.
In FTP Site Manager or other FTP software, open the folder where you will find several files, and subfolders. A file will be named index.html and is the home page of the site. You need to transfer the entire folder and subfolders.
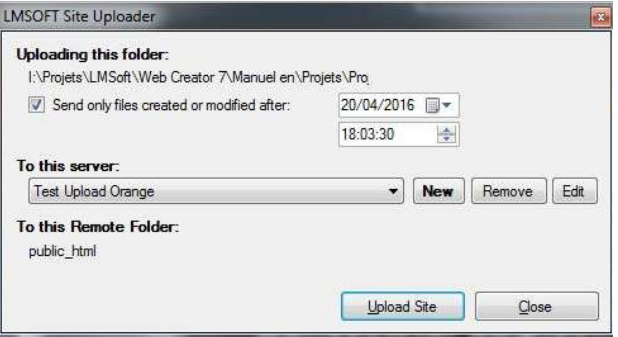
When your connection is set, you get to to the next dialog.

You can set the filter options to send only recently changed files , and select the server connection you want to use before you click Upload site for uploading.
When you want to set another host, click the New button to return to the Settings dialog box described above.
In case of errors, theres are the possible causes:
- A connection problem - verify that you are connected to the internet.
- Invalid path or file name – Should only appear the first time you connect.
- Invalid Username or Password. Check carefully and use cut & copy to fill these fields.
If the upload is going well, but your site is not instantly updated, check that source and destination folders are correctly set.
Search Engine Optimization
This terms describes the ability of search engines and visitors to discover and get to your site. There is of course a lot to say about this. It is beyond the scope of this manual, but here are some key points to respect for optimal SEO :
- The name of the site must be unique and representative of your business.
- The keywords should appear in the title of the home page but also in the other pages.
- Insert keywords in metatags project (Tools menu) and eventually each page if they must be different for each page.
- Apply tags saying "title" H1, H2 and so on at various places in the text of each page. Note that it is not necessary to change the text font . You can put a Hx tag anywhere in the text without it affecting the visual settings. Only the search engine robot will give extra importance to the tagged elements.
- In the properties of images, Options tab , Identification box, add keywords in the Alt tag next to the name.
Remember to republish the site for each change or addition of these SEO keys, so it's online and seen by search engines.
For further information and in view of the constantly changing SEO methods, we invite you to regularly consult the Google tips and other search engines sites
Finally, note that there is no way to get on the first page of search results and to stay there without effort. It is the content that makes everything, not the editing software.